• Skip to primary navigation
  • Skip to main content
  • Skip to primary sidebar

Second Story Window

K-3 Teaching Resources

  • About
  • Shop
    • My account
    • Downloads
    • Cart
    • Checkout
  • Blog
    • 1st Grade
    • 2nd grade
    • 3rd Grade
    • Back to School
    • Fluency
    • Daily 5
  • Word Play Phonics
  • FB Group

Toddler Time: Busy Bag Series Part 2

by Emily

I’m sharing some experiences and ideas from the recent busy bag exchange I posted. Read part 1 and part 3.


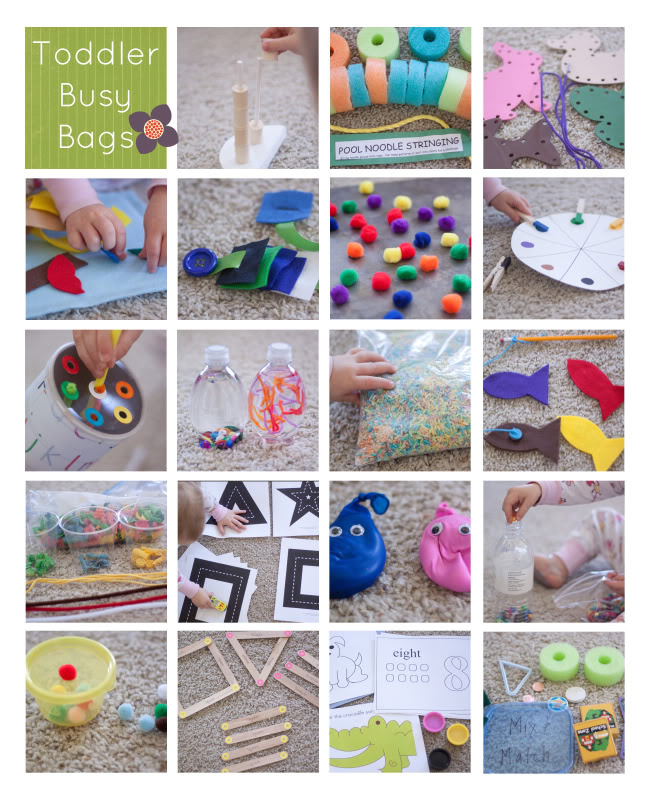
Today I’m sharing the 19 activities that were part of our toddler exchange.

I’m also sharing what my 18 month old daughter, Adelaide, thinks of the activities we’ve tried as well.

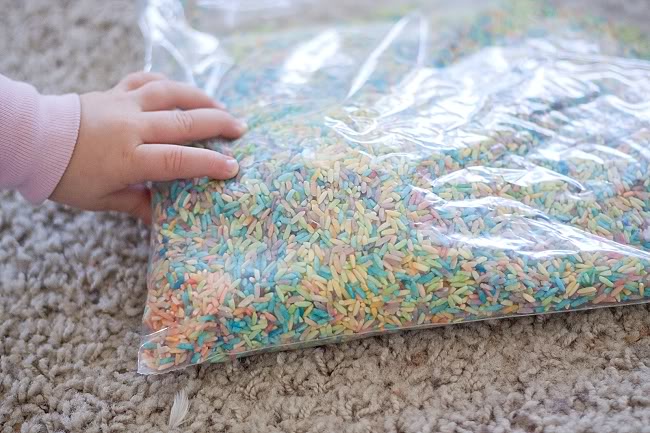
1. Rainbow Rice We haven’t played with this yet but it will be really fun in her sensory table, I’m sure. I know she’s going to love scooping it. I think it would be good to give the rice separated into colors first so the kids can do the color mixing themselves.

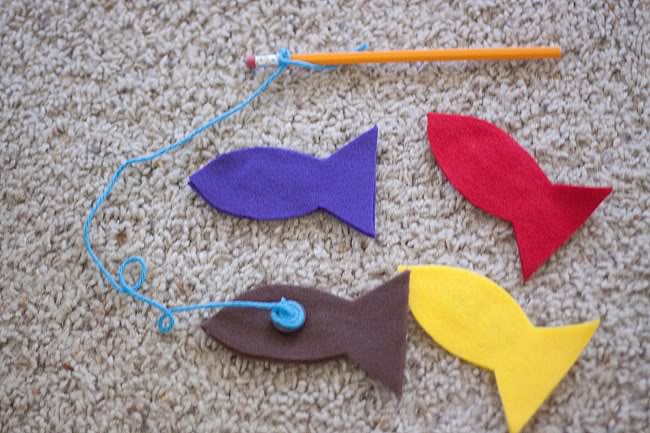
2. No Sew Fishing Game The fish have 3 metal washers in them so they get picked up pretty easily by the magnet. It will be easy to add more to the set, as well. I think A could probably do this one soon.

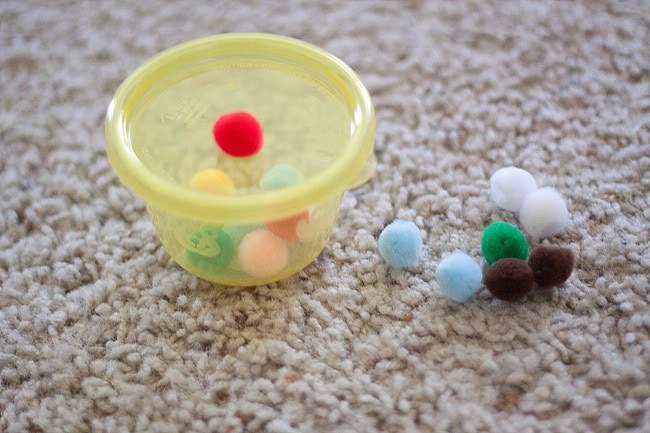
3. Pom Pom Stuff It In A favorite of A! She would love to dump them back out again but doesn’t know how to open the lid (yet!) It’s the perfect size to throw in my diaper bag. She’s played with it every week during church.

4. Button Snake It can be tricky getting the chunky button through the slits but after you do it a few times the holes become bigger. A isn’t quite able to do this one yet and it doesn’t grab her attention. Maybe in a couple months!

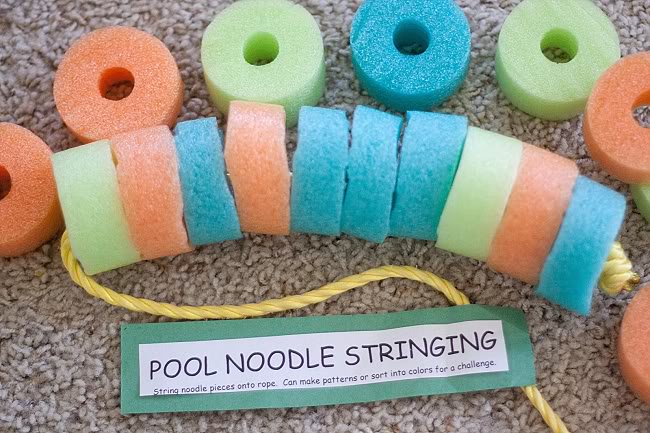
5. Pool Noodle Stringing With a little help, A can totally string these and loves doing it (and then taking them off again.) The chunky rope is a great size for her hands.

6. Wacky Sacks The only issue with us for these is that the eyes keep falling off. Some of my friends said their older kids (3+) have already broken and ripped these open. Maybe best for the very young crowd.

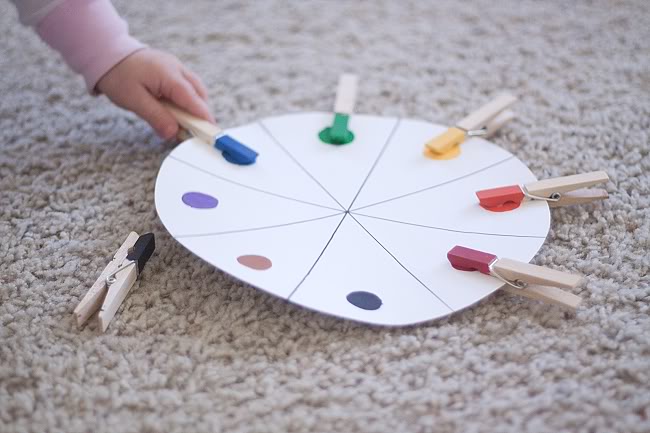
7. Color Matching Wheel So far A just likes to take off the pins that I clip on but soon I think she’ll be interested in putting on the pins herself.  The color matching aspect is a little ahead of her too. The clothespins can be expensive so look for a deal! Here are some clothespins from Amazon that work out to be .08 a pin.

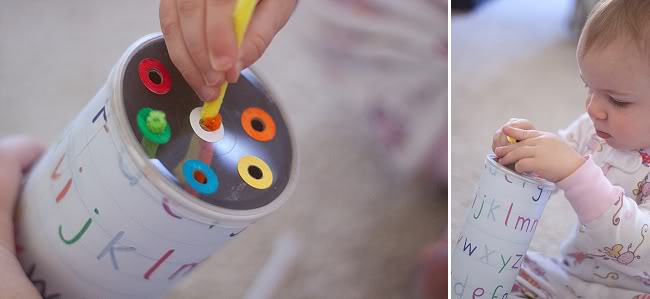
8. Pipe Cleaner Toy (another link here) A is nuts for this activity. She has played it every day since we got it. She doesn’t understand the color matching yet but loves putting the pipe cleaners in any hole. I think she also really likes the sound the cleaners make tinkling against the metal bottom of the Pringles can. I really like that she can grow into the color matching aspect of this activity. And the pipe cleaners are store inside which is just an added bonus.

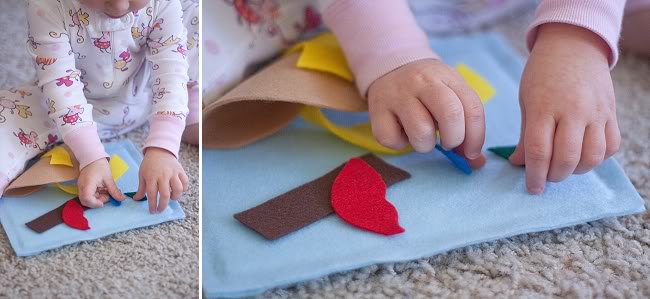
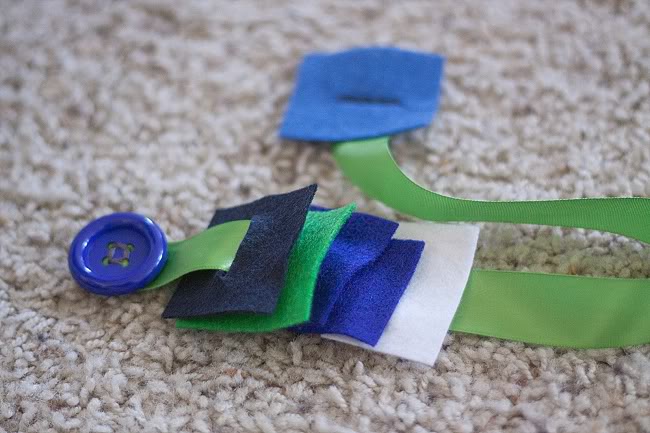
9. Mini Reversible Felt Toy Wish I’d gotten a picture of this before A pulled all the pieces apart. She’s not ready for creative building but she did enjoy playing with the pieces. It would be tedious cutting them all out, but felt is cheap at least!

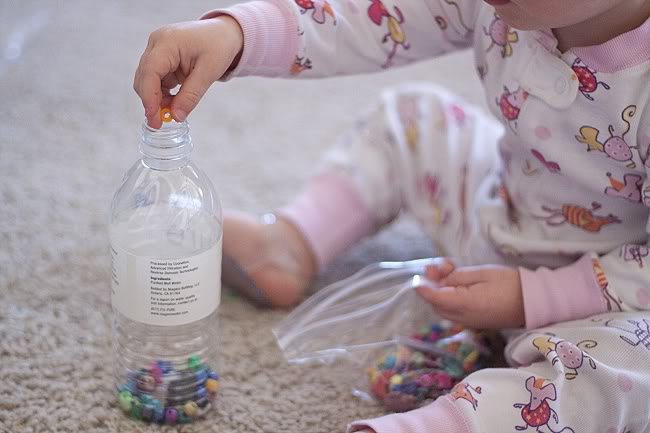
10. Beads in a Water Bottle Pretty simple activity to put together: an empty water bottle + bag of beads! A loves dropping them in, especially the sound. She only fills up the bottom part before dumping them out again, which she thinks is so fun. I always stay close so these don’t end up in her mouth and/or scattered all over the house. Definitely a hit with her!

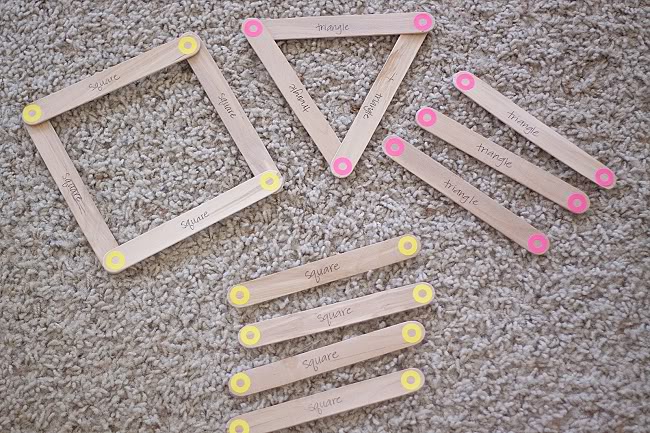
11. Velcro Shape Sticks We haven’t tried this one yet. I’ll probably add a few more shapes eventually. May also add some sticks with velcro  that can be used for free play. (If you use the velcro dots make sure they are the right size for the size sticks you buy.) I like the color coding on these. I think it will be a big help when she’s ready to try out building the shapes.

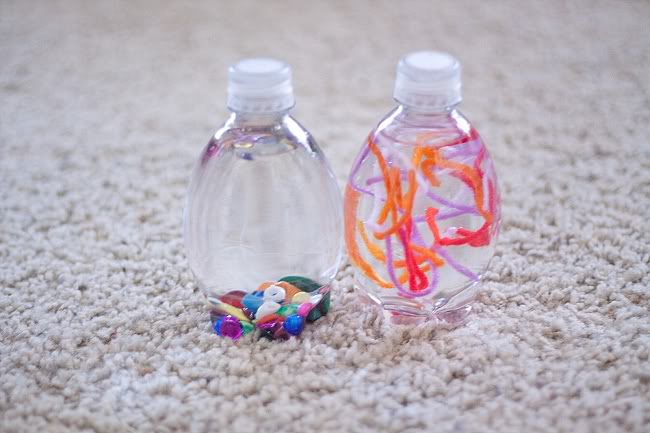
12. Discovery Bottles These are the prefect size for little toddler hands and go great into a diaper bag for an on the go activity. The problem for us is that A loves to drink out of our water bottles so she just holds these bottles out to us and whines because she wants to drink out of them! Don’t worry, the lids are hot glued on.

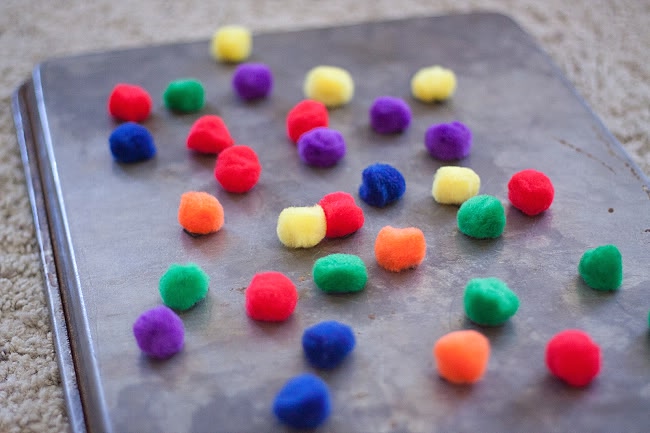
13. Magnetic Pom Poms This is such a fun idea for pom poms! I am brain storming a way to make a smaller magnetic surface that can stay in the busy bag instead of having to get out the cookie sheet. That being said, the cookie sheet works great!

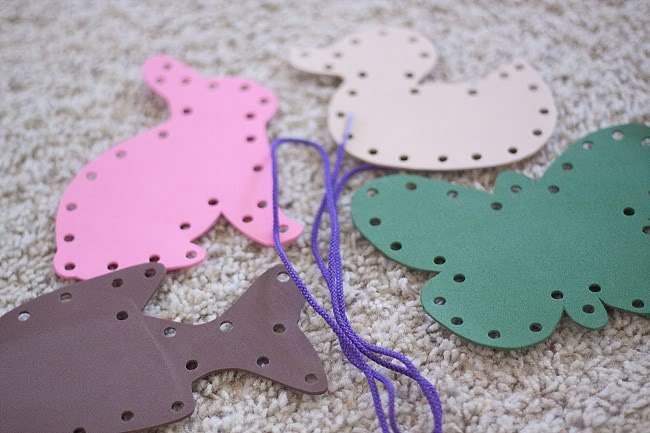
14. Lacing Cards A isn’t quite ready for lacing yet but these cards are really cute! The templates would help make it a quicker project.

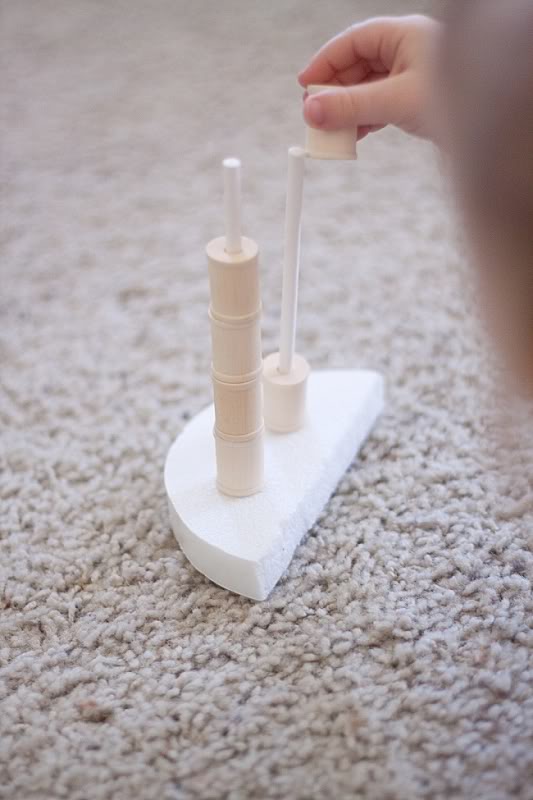
15. Spools and Straws This one is a hit with A! The problem? She’s pretty rough with it and the holes have been mangled in the styrofoam and now the sticks don’t stick up straight, which makes her frustrated. She loves this so much that we’re thinking of making something small with wood that she could use and hopefully will hold up to her abuse! The little spools are adorable.

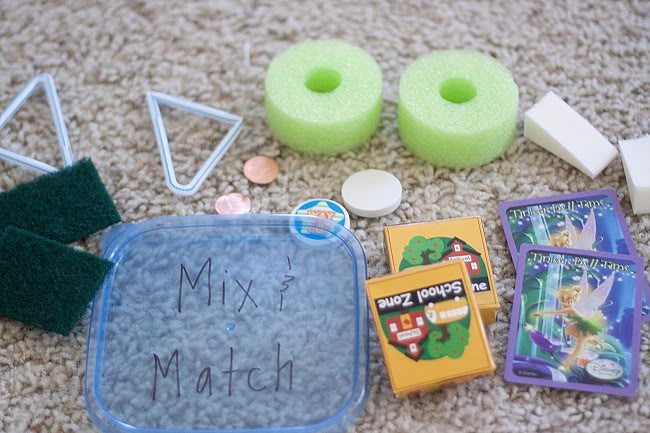
16. Mix and Match Game A is too young to understand the matching component but enjoys playing with the little treasures. I have to stick close to her so that the little pieces all end up back in the container!

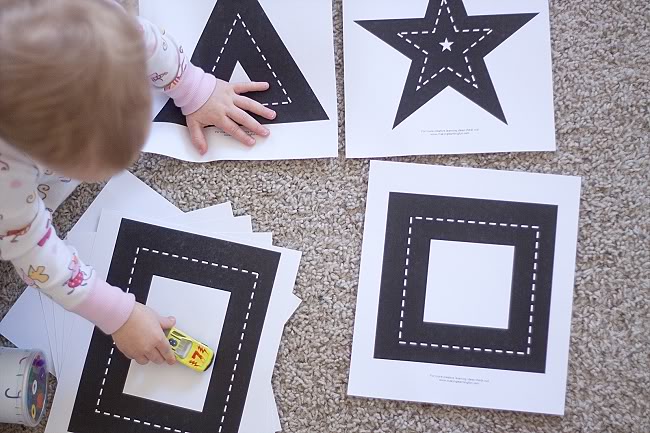
17. Race Car Shapes  As soon as I laid this out to photograph it, A was immediately drawn to it. The person who put it together included a car which was great since we don’t have any. I think A will really enjoy playing with these!

18. Play Dough Mats These are really cute mats. I will definitely be laminating them and hole punching them (the girl who made the bag included rings to make them into a booklet.) Be aware that if you don’t have access to a color printer this project can get very expensive if you plan to print a lot of pages!
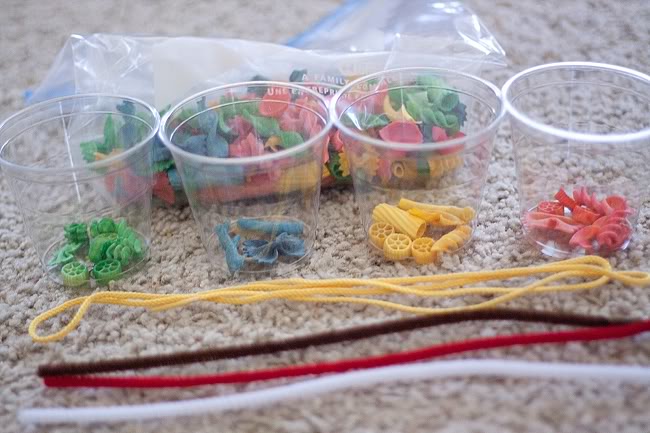
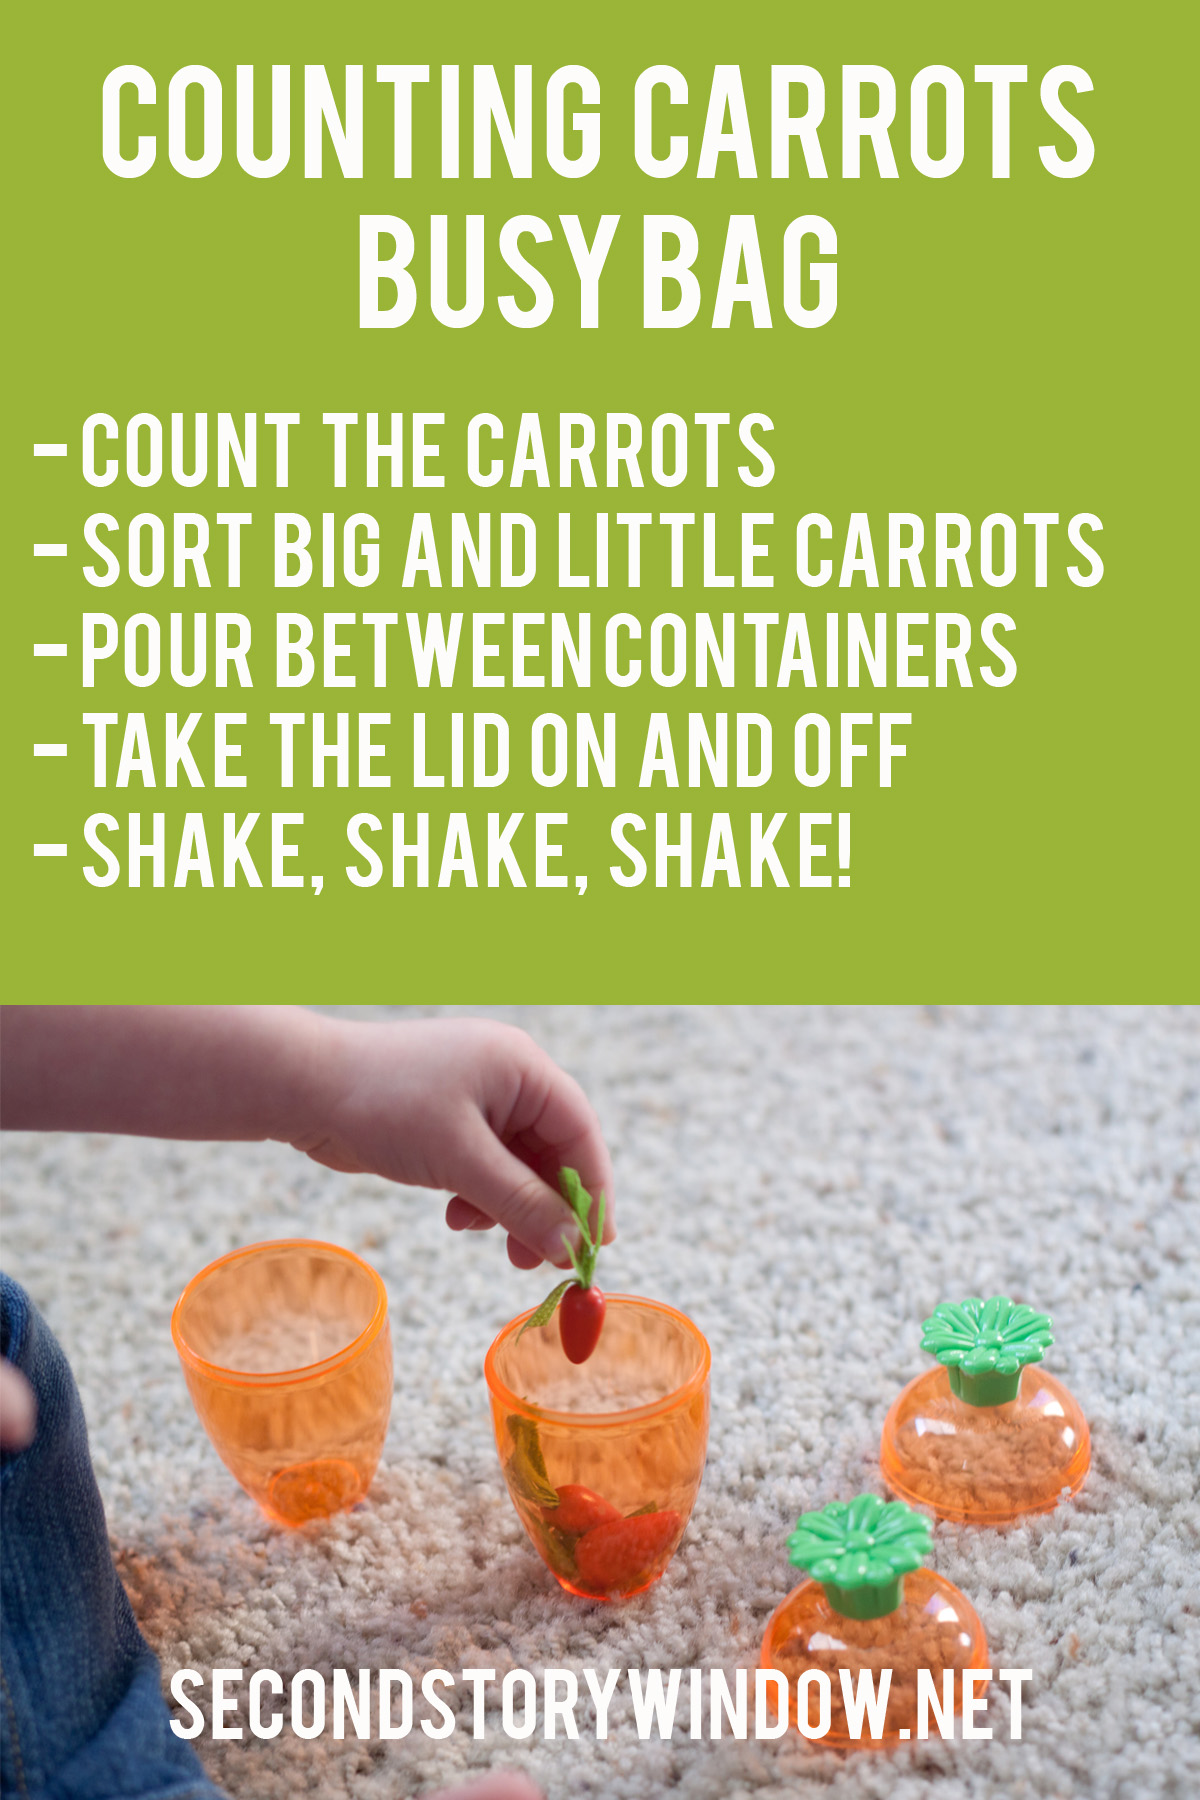
19. Pasta Sort
This was my project. First of all, dyeing the pasta was easy but took a lot of liquid food coloring (I used half a bottle of color for probably 2-3 boxes of pasta). I suggest double bagging the pasta while you dye it because I ended up with color all over my counters (but it cleaned up easily.) The alcohol smell really sticks around on the pasta. The batches I left out for a few days smelled better than the ones I made right before the exchange and didn’t have time to air out for as long. If your child puts these in their mouth or gets them wet, the color will get on their skin. I included 4 cups (for sorting by color but you could include more cups and do shape sorting too.) I also included a shoelace and a few pipe cleaners for different options for stringing.

See the Preschool Busy Bag Swap HERE. See more busy bag posts. Follow me on Pinterest for more inspiration.

Related

Filed Under: activity, busy bag, Toddler

Previous Post: « Toddler Time: Hosting a Busy Bag Exchange
Next Post: Toddler Time: Busy Bag Exchange Part 3 ( & Freebie!) »

Reader Interactions

Comments

  1. Emily Kate says

    October 25, 2011 at 5:00 pm

    Hi Anonymous, ;)Im working on that post as we speak. Should be up this afternoon. Thanks for reading!

  2. Heidi says

    October 27, 2011 at 5:00 pm

    Emily, maybe the dollar store has metal stove burner covers. I know the Reading Recovery teachers at my school use those for mini magnet boards (instead of cookie sheets). Or after Christmas maybe someone will have the lid of a popcorn tin.

  3. Country Girl in the City says

    October 28, 2011 at 5:00 pm

    HI Emily, thanks for stopping by my blog to let me know that you used the rainbow rice. I love how you wrote about each bag and included all the details. I have participated in two swaps with Unsolicited Advice, but because Im in Canada the shipping is actually quite expensive. I will have to stick with making my own bags and there are a lot on your site the we do not have yet. Thanks for all the great ideas!Margaret

  4. Abiding Mom says

    October 28, 2011 at 5:00 pm

    What great ideas! Thanks so much for sharing!Ericawww.confessionsofahomeschooler.com

  5. Judy says

    November 11, 2011 at 4:00 pm

    LOVE what youve done and so thankful you shared this! Recently just became a WAHM and am looking for fun, educational things to do with my little girl! Thanks you!www.keepinhome.blogspot.com

  6. 631a23e2-6b5c-11e0-b55b-000bcdcb2996 says

    November 22, 2011 at 4:00 pm

    You can also use an 8 or 9 inch metal cake pan as a magnet board. Its compact and it can hold the pom poms as well for travel. Or maybe even a small tin that you would put Christmas cookies in, even better because it has a lid!

  7. Anonymous says

    January 3, 2012 at 4:00 pm

    I have seen small magnetic picture frames that would work great for your pom pom magnets. I have seen them at craft fairs and unique shops in Holland, MI (Home & Company).

  8. equipo: Hannah/Noah/Hilke says

    January 11, 2012 at 4:00 pm

    Nice ideas!!Thanks for sharing!

  9. Anonymous says

    January 14, 2012 at 4:00 pm

    Im the Director of a child care center and was super excited to see the ideas on here. Many of them are wonderful but I wanted to let you know I did get an uneasy feeling about some.. please be careful of items that may be potential choking hazards. The general rule of thumb is: if an item can fit through a toilet paper tube, it IS considered a choking risk and should not be given to children under the age of three. Also, magnetic pieces are dangerous for young toddlers. They could swallow the magnets and it could do serious damage to their internal parts.Im not trying to be Debby Downer and your ideas are amazing..just dont want anyone to get hurt and it come back on you. 🙁

  10. Emily Kate says

    January 14, 2012 at 4:00 pm

    Anon, I can understand your concern. I hope that all parents are aware of the dangers in almost any activity or toy for young children. The parents must make the decision about which activities are appropriate for their child and then supervise them accordingly. Personally, my daughter has only been allowed to play with a select few of these activities and only when she is sitting right next to me so I can be sure nothing goes in her mouth.Thanks for the reminder.

  11. Unknown says

    January 22, 2012 at 4:00 pm

    Hello!This is sooo cute!! For the magnetic pom poms… You can get a metal box… like the kind you put Christmas cookies in or whatever. You can usually find them real cheap around any holiday, or you can buy them at a craft store with out any decoration on them (these do seem more expensive than the holiday ones). A lunch box works well too. I am making magnetic paper dolls and am using a large metal box for play and storage.

  12. Natalie {Parade of the Day} says

    January 22, 2012 at 4:00 pm

    I have been looking for some great quiet bags for church and found you on pinterest! Thanks for sharing! P.S. my babies name is also Adelaide!

  13. Anonymous says

    January 23, 2012 at 4:00 pm

    I too was a bit concerned– about the developmental appropriateness of some of these for a toddler, however I teach Kindergarten and think some of these ideas are terrific for 4 and 5 year olds! Thanks for sharing and included the lovely photos.

  14. Jen-Jen says

    January 26, 2012 at 4:00 pm

    I was wondering how much rice you need to use for the swap — about how much did you use per child?

  15. Emily Kate says

    January 26, 2012 at 4:00 pm

    Its really your preference. Our bag looks to be at least 4 cups. I think a cup per color is a good starting point if youre planning to do a few colors.

  16. kristi says

    February 9, 2012 at 4:39 pm

    I’d think alot of these are choking hazards for toddlers?!

  17. emily kate says

    February 9, 2012 at 5:10 pm

    Kristi I addressed this above. We definitely recommend the busy bags only be used with supervision.

  18. Kaly says

    February 17, 2012 at 9:02 pm

    Thanks for this fantastic post! In regards to having something small for a magnet board – I once saw a child at church using an old day planner (which zips close). The tin was somehow on the back cover, and there were several pages of magnets which were attached in the 3-ring closures. Does that make sense? I’m not sure how you’d put that together, but if you’re handy, you can buy sheeting metal at any furnace store – you could have it cut really small (to fit in the day-timer) and either punch holes to attach it to the rings, or somehow glue it to the back. You could cover the edges with something so the edges aren’t sharp. Sounds like a lot of work, but it really would be a simple thing – and it sounds like you’re handy, so you could do it!
    Alternatively, you could get the sheet metal and back it with cardboard and cover it all with heavy fabric. That’s even easier! ha!

  19. Christina says

    February 23, 2012 at 4:15 pm

    i use one of these to cook just a few cookies at a time: http://www.amazon.com/Kitchen-Supply-Toaster-Non-stick-Cookie/dp/B001ET7B8U/ref=sr_1_2?ie=UTF8&qid=1330042167&sr=8-2 seems like it might be the right size for pom poms and fits in a purse

  20. emily kate says

    February 23, 2012 at 4:28 pm

    That’s a clever idea, Katy! Thanks for sharing!

  21. emily kate says

    February 23, 2012 at 4:28 pm

    That’s a great idea. And they’re really inexpensive too!

  22. Liz L says

    March 30, 2012 at 11:00 am

    Color matching wheel is so cute. Just wanted to warn you that the clothespin clip can come off easy. My friends four year old almost choked to death on one that sprung off. So major supervision with this one would be good. Just wanted to share, since this is something you would never think of unless you heard of it.

  23. Beth says

    April 13, 2012 at 10:16 am

    Beware that many of these ideas are choking hazards to little ones!

  24. emily kate says

    April 13, 2012 at 10:33 am

    Beth, as we have stated several times throughout the busy bag posts and comments, these activities are intended to be used with supervision. And the parent must ultimately decide what activities their child is mature enough for and then supervise accordingly.

  25. Momtojman.blogspot.com says

    May 6, 2012 at 7:49 am

    This is awesome. I’m currently a teacher and staying home next year. I am so excited of all the great things to do with my toddler.

  26. Chris Amick says

    May 13, 2012 at 8:52 pm

    Hi. You’ve got some great ideas there. What do you think about using Cheerio’s or Fruit Loops instead of beads for fine motor control/pincher grasp? I would worry about the little one eating the beads when you aren’t looking (kids are sooo fast.) It is possible to use dowel rods in place of straws for the spools and straws. You could even use styrofoam blocks for the base. Muffin tins (6 count) or ice cube trays are great for sorting things. Colored pasta is great in a sand/water tray. You can use a small wash basin and spoons/yogurt cups for pouring practice. My dd loved playing in a cup or two of flour in the basin. Two’s and threes can do many things. They aren’t as fast as older kids but given a chance and they’ll blow your mind with what they can do. Ya’ll are doing a great job.

  27. Lily says

    June 21, 2012 at 7:42 am

    You can use vinegar instead of alcohol to dye rice and pasta. Then it’s safer if kids taste it, plus it doesn’t smell as awful.

  28. Brenda says

    June 23, 2012 at 8:19 pm

    Hi – haven’t read all the comments, but if you are still looking for a smaller surface for your magnetic pom-poms – try a metal cover for a gas stove. They are about 5 or six inches wide and come in circle or square styles.
    Love these!

  29. Brenda says

    June 23, 2012 at 8:23 pm

    … those would be gas stove BURNER covers …
    Here’s an example:
    http://www.burnercoverking.com/RoundCovers-Color.html

  30. Ashley Johnson says

    June 26, 2012 at 3:51 pm

    I just bought some metal shingles from Home Depot for the magnetic pom poms. I got a 5×7″ sheet for around $.60. Super cheap, and they work great. I will either cover it with something or I had thought about adding duct tape with batting as a frame around it to save the kiddos from the sharp edges. Nice and small to fit nicely anywhere really, fairly flexible too.

  31. Nicki says

    August 24, 2012 at 8:09 am

    You could use the little metal toaster oven tray for the magnetic Pom poms activity as well.

  32. Tara B. says

    September 22, 2012 at 8:43 pm

    I don’t know if anybody else has already said this, but I thought using puff paint for the faces on the balloons might be more durable than anything that’s self-adhesive and rigid like the googly eyes. Knowing my toddler, she would figure out how to take the puff paint off, too. But it would definitely be more flexible. I’m going NUTS about all the ideas I’m finding for busy bags! Thank you for posting all these ideas!

  33. emily kate says

    September 23, 2012 at 9:08 am

    That’s a great idea! Hope you have fun making your busy bags. 🙂

  34. Tara B. says

    September 24, 2012 at 11:05 am

    I AM!! These are so simple and quick to finish that I’m just burning through them. One complaint that some people seem to have on all the blogs I’ve visited is that the supplies to make the bags come in large quantities, so money is wasted…but I’m having a ball making them up as gifts for my friends’ kids. Talk about easy Christmas/birthday gifts!

  35. Amy says

    September 24, 2012 at 12:56 pm

    I like the pom pon and magnet idea. A way to make it portable would be the tea tins from Starbucks. They can store in the tins and use the lid as the base. Just a thought.

  36. Cindy says

    October 8, 2012 at 7:26 pm

    Great Ideas. Here’s an idea for a smaller magnetic board for Magnetic Pom Poms ..a lid from a cookie or nut tin

  37. Elizabeth Scarborough says

    January 7, 2013 at 6:34 pm

    Hi,
    I just came across this site and I love it! Thanks for posting all of these great ideas! I have a question about the pool noodle lacing. I see in the picture on this site the pattern cards with the pastel colors, but the link to the printable has only primary colors. I could only find pastel noodles and was hoping to find a printable of the pastel cards but I can’t find them anywhere. Do you have this? Thanks!

  38. emily kate says

    January 7, 2013 at 7:00 pm

    I wasnt the one who made those cards. Im not sure where the girl who made that bag got them. Maybe she made her own? Sorry!
    Sent from my iPhone

  39. Nicki says

    February 27, 2013 at 7:28 am

    In regards to the magnetic Pom poms…I have a small metal cookie sheet that fits in my toaster oven that would be perfect for this or any magnetic activity. I’ve used it for my 7 year old daughter with magnetic money. The small cookie sheet fits in a gallon size ziploc bag perfectly. 🙂

  40. Organic baby says

    March 17, 2013 at 9:30 am

    These are all good ideas. I think that parents can try them with their kids and see which ones the children like doing. Some activities will be more challenging to young children while they may not be too interested in others.
    Parents may not always know which ones their kids will like. with such a wide selection though, adults should be able to find enough to keep little ones busy over and over. I like the fact that they are easy to make and easy to fit into a handbag.

  41. Sarah Henness says

    May 6, 2013 at 5:05 pm

    You can get small pieces of metal in the embroidery section of some craft stores. People use them to keep track of where they are with cross-stitch.

  42. Alessandra says

    June 7, 2013 at 1:46 am

    So much lovely ideas! I put this post in my shop facebook page! 🙂 https://www.facebook.com/pages/Mapan%C3%B2/115077835271835?hc_location=stream

  43. Bobby says

    June 24, 2013 at 8:01 pm

    I don’t know if you’ve found a smaller magnetic surface for the magnetic pompoms yet, but the metal pencil cases from the Dollar Store would work great!

  44. Yellowlovesgrey.wordpress.com says

    June 28, 2013 at 10:17 pm

    Thanks for your great ideas! Just hosted my first busy bag swap earlier this week. It went great.

  45. Brigette says

    July 30, 2013 at 10:01 am

    I love your post on busy bags, I have made a bunch for my own kids and they are addicted! I did a roundup of bags we have made on my blog and linked to your tutorial, you can check it out here: http://babesindeutschland.com/ Thanks for the inspiration!

  46. Heidi Butkus says

    August 17, 2013 at 2:39 pm

    I just adored this post and your wonderful ideas! I found you via Pinterest. Thank you so much for sharing. I teach Kinder and many of them can be adapted for older children, too. I will definitely be following you from now on! Your children are lucky to have you.
    Heidi Butkus

  47. Megan says

    August 20, 2013 at 11:12 pm

    Any ideas on how to print the race car shapes without the little tag line at the bottom that says “for more creative learning ideas check out http://www.makinglearningfun.com“? It ruins the look of the cute shapes. I keep trying to figure out a way to delete that line.

  48. Mealeen says

    September 18, 2013 at 7:10 pm

    Love it! Love it! Love it! I am SO going to suggest this for our ward!

  49. Kristi says

    March 21, 2014 at 5:44 am

    In my kindergarten classroom I use metal stove covers when using magnetic letters etc. They are harder to find since many stove tops are flat now but they are small enough to fit in a gallon size bag.

  50. Julie - Ladybug's Spots says

    March 26, 2014 at 9:48 pm

    Thanks for all the great ideas. I am about to have baby #2 and am looking for some quick little busy bags for my daughter to do while I am breast feeding and tending to the newborn.

Primary Sidebar

HELLO!

We are Heidi and Emily. Sisters. Heidi & Emily are both former 2nd grade teachers and current preschool teachers with a combined 17 years experience.

Get Connected

  • Facebook
  • Instagram
  • Pinterest
  • Twitter

CURRICULUM

1 Week Free Word Play

Subscribe to Blog via Email

Enter your email address to subscribe to this blog and receive notifications of new posts by email.

Search

Archives

Categories

search shop

© 2021 Second Story Window. Terms and Conditions | Contact

Cookies

This site uses cookies to store information on your computer. Some are essential to make our site work. Others help us improve your user experience or to allow us to track behavior and user patterns. By using the site you agree to these terms. View the terms here.